 |
Directions:
|
Establishing a Connection
When you're done setting everything up, you're ready to establish a connection between the computer and your Dreamcast. The first thing you need to do here is hook your DC up to your computer's modem. This is really easy but some people manage to get confused here for some reason. Plug one end of the phone cord into the Dreamcast modem, and the other into your PC's modem. If you're having trouble, pretend for a minute it's 1995 and you're connecting to America Online. Connect your computer's modem to the wall jack the way you normally do, and then backhand your sister for hogging the phone line for the last three hours. You have a 5Mb file to download and your expecting an important call in about two hours so there's no time to lose! And it's almost the first of the month so you have to hurry up and cancel the AOL account so you can crack open another one of their so-called "free trial" CDs. Ok, snap back to reality now. Take the phone cord out of the wall jack and connect it to your Dreamcast's modem. Now apologize to your sister for getting caught up in the moment and hitting her for real. But who cares about her, we're all hooked up and have a connection to make :)
You're going to have to do a little work now to get this connection up, but after you do it a couple times it becomes second nature. Basically you get the Dreamcast to connect the way it normally does. No matter what you're trying to do (i.e. browse the web, email, play PSO or NFL2k2) just make the DC dial out the way you normally would. If you have problems with the Dreamcast saying it can't detect a dial tone, you're going to have to do some juggling to get it to connect. This is just because of the way certain games are programmed; they don't support blind-dialing (dialing without a dial tone). In this case you're going to have to plug your DC into a live phone jack to get the dial tone. Then after the Dreamcast begins dialing, switch the cord back to the PC.
After the Dreamcast has begun dialing, you can open up the modem on the PC. This step is different depending on the version of Windows you're running and the connection method you've chosen. In case you need a refresher on how to do this, you can select your OS from the box below and it will take you back to where the instructions are given. Also if you're looking for a good tool to automate the process of connecting/disconnecting I highly recommend Girder.
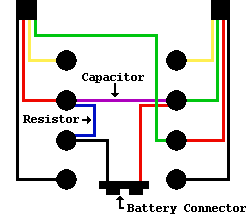
If you're having problems connecting, and you suspect it may be a problem with the Dreamcast modem, you may be right. Some Dreamcasts were shipped with modems that rely on the voltage of a live phone line to work properly. There is a workaround for this, the so-called Line Voltage Simulator. The discovery of the problem is credited to Jon Nehman, and the device was concocted by Michael Nolan and his (unnamed) brother. I'll quote Michael's original email below. Michael Nolan's directions are a bit off, but thanks to RVWinkle we have the corrected directions printed below. If you're going to build one of these you should check out RVWinkle's website.
Dreamcast Modem Line Voltage Simulator
Component List
|
 |
Directions:
|